Monday, November 22, 2010

Coffee Cake: "I feel like a huge idiot! All these years I’ve never tried coffee cake because I don’t like coffee. I didn’t know it didn’t have coffee in it."

Coffee cake cupcakes having a moment in the sun before a taste test with friends.

Often, I read the reviews and comments of the recipes I intend on trying out myself. Usually this is informative, but sometimes it's a little amusing. I don't think it's an uncommon assumption that coffee cake has coffee in it. Let's go along with the idea that it is referred to as coffee cake because it's great with a nice, hot cuppa.

 Blending the brown sugar and cinnamon topping with my favorite tool, the pastry blender.

If this cake were to be named for something that's in it, I'd go with butter. Sure, there's a generous amount of sugar, both brown and white, but who is ever shocked at the amount of sugar in a dessert? Certainly not me. This cake (now is the time you might want to look away if you've already had a slice) contains three sticks of butter. That's around 350g, for the metric folk out there. Before you start crying, I reduced my version down to 250g, or a bit over two sticks of butter. Not really out of fear of cardiac arrest, but rather out of necessity; I only had one brick in the fridge.

The cake batter is thick; be sure to have a rubber scraper on hand because even hard whacking against the counter won't settle your batter evenly in the pan.

If you can get past the outrageous amount of butter, you can begin to appreciate this cake for being remarkably delicious and Ree Drummond at Pioneer Woman for wrangling this out of her mother's recipe binder.

Coffee Cake
 Adapted from Ree at Pioneer Woman
Yields one 9"x13" sheet cake and nine cupcakes

Cake
1 tsp  salt
3  egg whites
1 1/2 sticks (3/4 C or 172g)  unsalted butter, soft
2 scant C (345g)  sugar
1 T  Kahlua or vanilla, optional*
3 C (298g)  all-purpose flour
4 tsp  baking powder
1 C  milk*
1/4 C  plain yogurt*

Topping
5 T (75g)  unsalted butter, cold*
3/4 C (75g)  all-purpose flour
1 1/2 C (302g)  brown sugar (not packed down)
2 T  cinnamon
1 C (130g)  pecans

*These are deviations from the original recipe. These are the original ingredients and amounts: No Kahlua or vanilla, 1 1/4 C whole milk, no yogurt, 1 1/2 sticks (172g) softened butter for the topping.
  1. Preheat the oven to 350F (177C) and grease the cake pan and line the cupcake tins.
  2. Combine the egg whites and salt and beat until stiff; set aside.
  3. Sift together the flour and baking powder; set aside.
  4. Cream together the butter and sugar and then mix in the Kahlua and yogurt.
  5. Alternately mix in the flour-baking-powder and the milk; do not over mix.
  6. Fold in the whites.
  7. Combine all the topping ingredients and cut together with a pastry blender.
  8. Fill the cake pan and cupcake tins about 2/3 to 3/4 full and sprinkle topping on.
  9. Bake the cake 40-45 minutes and the cupcakes 20-25 minutes or until an inserted toothpick comes out clean.
  10. Cool to a temperature that won't burn your mouth (room temp is always a safe bet) and enjoy!
Coffee Cake Reflections

 The cake didn't bake up around the topping as much in the sheet pan compared with the cupcakes, but it was just as yummy.

I caught the cupcakes right at the point where the batter goes from goopy to solid, affording me the softest cake I've had in my life. The topping was crisp and a bit crunchy, a very nice contrast to the delicate sponge. This magic is a combination of the right recipe, not over mixing, and pulling the cupcakes from the oven at just the right moment.

The recipe made what I'd consider to be way too much topping for the portions I made. Perhaps if it was all done in a deeper pan or one with more surface area, the amount would have been just right. The topping recipe above is how I did it, so feel free to halve that (reduced butter) or the original recipe.

Something not so magical: My butter had been in the freezer up until I needed it. Sooo it wasn't exactly softened when I went to go cream it. I also, rather mysteriously, threw the sugar in with the other dry ingredients to be sifted. Awesome job, brain. Way to get those synapses firing at full speed at 10:30 in the morning. Despite my rough start, everything came together. The textures and flavors in this cake are pretty perfect. I think it has something to do with all that butter.

The cake made its official debut at a housewarming hosted by my friends at Ming and Milo. It became a part of the wine tasting later in the evening, which featured wines from my home state! If you happen to be in Singapore and are scouring the island nation for the best pairings, they are your guys.

Sunday, November 14, 2010

Next Post: Thank Ree @ Pioneer Woman

 Crumble topping with cinnamon, brown sugar, and pecans.

I have found another blog to sing the praises of: The Pioneer Woman. Ree Drummond writes about food, photography, life on the ranch, and more. She has a wonderful writing voice and takes beautiful pictures. And she is not afraid of butter. Ree Drummond, I applaud you.

Stand-in taste testers, Sunday evening's dinner party guests, and you readers have her to thank for the next butter-sugar-dairy rich post.

I'll be off the grid over the next three days due to frantic packing, flying from Singapore to Seattle via Tokyo, and face planting into my childhood bed. Maybe add a few more days onto that for my oldest friend's sixth annual Rock Band party, another friend's studio opening, additional face planting, and the pursuit back home food favorites like Cave Man Kitchen. Until then, you can drool over the crumble topping above.

Keep Baking,

X Melissa

Saturday, November 13, 2010

French Apple Tart: Is It Still French If I Add Cinnamon?


The apple tart on the road to my friends at the dessert bar. Who better to share with and get feedback from?

This is going to sound incredibly cheesy, but bear with me. Do you ever wake up in the morning and just feel inspired? That instant I've-just-got-to-do feeling and you're not even quite sure what it is that you've got that feeling about yet, but you know something is coming?

 I had these apples in the kitchen to have with yogurt and granola for breakfast, but I think they were dedicated to a far greater cause.

That's how I felt Friday. I was itching to bake. It's not as if I was going through withdrawals; I'd made two different batches of cookies, a crepe cake, and a lemon cake the week before. Still, I itched. I knew I didn't want to make more cookies or cakes. Then I thought about fruit and what was in the kitchen. Grapes... Dried cherries... Grapefruit... Apples... Bright green apples... Granny Smith apples. DING DING DING! It was time to make a tart.

 One of my favorite tools in the kitchen: The humble pastry blender. It is used to cut solid fats into dry ingredients, which plays a major roll in achieving the lightest, flakiest pie and tart crusts you can imagine. I hope there are other people that wax poetic about you, pastry blender, because you deserve it.

Google, that brilliant, mildly creepy creature that knows way more than a magic eight ball, gifted Ina Garten's French apple tart recipe to me. Not one to be ignored, the search engine put the Barefoot Contessa's recipe at the top of the list.

Measuring out the flour, sugar, salt, and butter for the crust.

French Apple Tart
Adapted from Ina Garten at The Food Network
Halved from the original recipe, makes one 8" round tart


Left: The pastry blender at work. Top right: After using the pastry blender, the dough resembles coarse bread crumbs. Bottom right: The crust pressed into the pie pan and pricked with a fork.

Crust
1 C (100g)  all-purpose flour
1/4 tsp  salt
1/2 T  sugar
6 T (86g)  unsalted butter, cold and cubed
1/4 C  ice water

Quarter inch apple slices.

Apples
2  Granny Smith apples
1 T  sugar*
1 tsp  cinnamon (optional)*
2 T  unsalted butter, cold and diced (softened is fine)
2 T  peach jam*
1/2 T  water*

*All of these are deviations from the original recipe. These are the original ingredients and amounts: 1/4 C sugar, no cinnamon, 1/4 C apricot jelly or sieved jam, 1 T water, Calvados, or rum.

 Butter makes the world go round.
  1. Combine the dry crust ingredients (flour, salt, and sugar) and cut the butter in until the mixture resembles coarse crumbles.
  2. Add the ice water tablespoon by tablespoon, tossing with a fork after each addition, until the dough just holds together (you don't want it too wet; I only used 2 T).
  3. Quickly knead the dough together (just a few turns), wrap, and refrigerate at least an hour or pat it down to about 1/2" thick and keep it in the freezer for 30 minutes.
  4. Preheat the oven to 204C (400F).
  5. If the dough is in the freezer, remove it and let it sit on the counter while working with the apples. If it's in the fridge, leave it there. Now peel, halve, core, and slice the apples into 1/4" slices. You can toss the finished slices in a little lemon juice if you work slowly and are worried about browning.
  6. Roll the dough out to fit your tart or pie tin and press it in. Prick the dough with a fork to prevent warping while baking. (Ina says to line the bottom of the pan with parchment, which I did, but I don't think it's necessary.)
  7. Overlap the apple slices in concentric circles on the crust or do whatever looks nice to you.
  8. Mix the cinnamon (optional) and sugar, sprinkle it over the apples, and dot with butter.
  9. Bake the tart 45-60 minutes, until the crust is brown and the apples have begun to brown.
  10. Warm (maybe 10-20 seconds in the microwave) the jam and water, mix, then brush it over the tart.
  11. Serve at room temperature or warm.
  12. Enjoy!
French Apple Tart Reflections
 It's funny that the light in the cab was better than the light in my apartment, though I'm not surprised.

  This tart is amazing. It's the kind of tart that makes my stand-in big brother at the dessert bar exclaim, "Oh my god. Spectacular." At first, I thought it was a little too tart, but as I ate my way towards the edge of the crust, I realized it was the triple layer of apples at the center that was a bit strong. I placed little slices of apple in the center to support the second ring of slices and then topped the center with a few more slices. Next time, I'll sprinkle a little cinnamon-sugar between the layers.

Also, I sort of cut the sugar topping down by 75% on accident. But what a happy accident that was! I knew sugar was going on top, but I read the crust sugar content again and sprinkled away. This is the way my not-professionally-diagnosed-mild-dyslexia manifests itself. Deliciously. I think the original amount would have cut the tart, Granny Smith flavor way too much. I mean, what's the point of using a sour apple if you smother the defining factor?

 This almost ended up on the cab windshield after some hard breaking. Luckily, I had it clutched in my hands because I didn't want my apple slices to slide around as it cooled. Pie-psychic. Uh, tart-psychic, technically, but pie-psychic sounds sooo much better.

Can I get an electronic hand clap for the cinnamon and jam please? The cinnamon is a throw-back to all my apple pie experiences in the States. I don't know how the French feel about cinnamon on apple tarts, but I think it's mighty fine. Also, I used my favorite peach jam from Organic Himalaya. I, um, didn't sieve it and sure, it was on the aesthetically lumpy side, but my taste buds could care less. I used about half of what the original recipe recommended, and I'd say this was the right choice, since more jam just would have distracted from those awesomely tart apples.

Finally, that crust. Man oh man, that crust! I think I got hung up on the pie crust recipe from my mom's late 1970's/early 1980's edition of The Good Housekeeping Cook Book and never bothered to try anything else, but it had slipped my mind this time and thank goodness for my brain's gentle reminders that I am no spring chicken. The crust is something that would make a person with the munchies' mind spin. Light, softly sweet, flaky beauty.

 Taking the first slice at the dessert bar.

I will definitely be making this again. This tart lands a pretty solid spot on my potential future bakery cafe list. Still, if that bakery cafe never happens, you can rest assured that the tart is easily made at home.

Wednesday, November 3, 2010

Pictures of Baked Goodies Past

Remember a long time ago when I just showed you slivers of what my friend Ari and I had made? Well, I never found the recipes that we actually used, so you'll just have to drool unfulfilled. We made apple pie with tart green apples and a crumbly cinnamon-sugar top, and yellow cake cupcakes with chocolate cream cheese frosting. We did play with sugar paste, trying out flowers and such, but only the snail survived. Have a looksie and don't forget to wipe your chin before you go anywhere.
 Oh, the yellow cake recipe is from Smitten Kitchen, which I've blogged before, just with chocolate chips thrown in. It really is a wonderful recipe. The photos are courtesy of my friend Ari and her lovely photographic skills.

Wednesday, October 27, 2010

The Day After McDelivery: Pizza

Spinach, zucchini, feta, and garlic pizza, my cure for pasta boredom.

The Resident Taste Tester is still in Deutschland, leaving me to fend for myself in the kitchen. Now, I don't want you to get the wrong idea (I can cook more than a mean quesadilla), it's just that it is far less enjoyable to cook for one.

 Cafe Karl Schneller on Amelienstrasse 59 in Munich. They had, hands down, the best cake I ate in Germany, and I ate A LOT of cake ("Kuchen" in German). Do practice your Deutsche ahead of time because the bilingual college kids are not always serving.

Last night, after several dinners of variations on a vegetarian pasta, I did something a little out of character... I ordered McDelivery. For one. Not only is that sad, it's a sure sign of RTT withdrawal.

Today, I fought back with home made pizza. Healthy home made pizza, the sort with spinach, zucchini, a bit of feta cheese, a dousing of olive oil, plenty of garlic, and a fifty percent whole wheat crust.

Smitten Kitchen has my go-to easy pizza crust recipe. I did the optional whole wheat flour substitute and followed the recipe pretty much as is.

Now, with a belly full of pizza, it's time to get back to my Halloween costume and adventures in sewing without a sewing machine!

 Pizza Crust
Adapted from Smitten Kitchen

Yields one thin pizza crust, approximately 12" in diameter

3/4 C (75g)  bread flour
3/4 C (100g)  whole wheat flour
1 tsp  salt (I use sea salt)
3/4 tsp  yeast
1/2 C + 1-2T  warm water
1 T  olive oil
  1. Dissolve the yeast in 1/2 C warm water and set aside.
  2. Combine the flours and salt in a medium bowl.
  3. Add the yeast solution and oil to the dry ingredients and stir, adding 1-2 tablespoons of warm water if needed.
  4. Knead the dough on a lightly floured surface for 1-2 minutes, then transfer to a lightly oiled bowl and cover.
  5. Let the dough double in volume (about 1-2 hours), then punch it down, cover, and rest for 20 minutes.
  6. Preheat the oven to the highest temperature and roll out the dough into a thin circle.
  7. Top with anything you like, just keep the slices thin and don't pile the toppings too high (otherwise your dough might not do so well).
  8. Bake approximately 10 minutes, until the edges of the dough are crispy and brown.
  9. Enjoy!
Pizza Crust Reflections

My dough didn't rise a whole lot; it could be because the yeast wasn't completely dissolved. Also, dough was on the dry side; even though this didn't really affect the end quality, it would have made kneading easier. The only thing I would change if I did it again would be to add another tablespoon or two of warm water and dissolve the yeast in it first (as the recipe is written above).

The RTT is gone for another week and a half; any hot ideas on cooking for one?

Tuesday, September 28, 2010

Hallo Deutschland

Hi all!

I'll be on my way to Germany to visit the Resident Taste Tester in one day. Don't worry, I'll be back in late October. Until then, I'll be eating a lot of Brot, wishing us away to Paris for a weekend, and I might even wear a Drindl.

Hang tight and keep baking.

X Melissa

Tuesday, September 21, 2010

Ladyfingers: Paving the Road to Tiramisu

 Ladyfingers piled into a tin shortly before being soaked in cold espresso.

I've done mis en place for tiramisu many, many times. I've even assembled these parts into a visually appealing (well, more or less given my fear of high speed plating) dessert on occasion. However, I've never made one of the very basic parts that arguably comprises a good two-thirds of the finished cake volume: Ladyfingers.

 Egg whites and sugar beat to stiff peaks.

Why on earth would you make the ladyfingers when you can buy them at the store and save yourself some time? I understand that at home, making tiramisu might seem like a lengthy process and the prospect of making each and every one of those little cookies (some of which break or dissolve to mush during the espresso soaking) sounds daunting, but I just can't help myself.

 Flour being folded into beaten egg yolks and sugar.

I need to know how things are made. I've come a long way from mixing flour, water, and food dye and "baking" it in the sun (I was a kid!), but the curiosity remains.

 Vaguely neat rows of piped batter.

Like I said, I've made tiramisu before, so that's part of the reason I won't go over the recipe (the other being it's not mine to share - oooh secret recipes). This, my friends, is about the humble ladyfinger.

 What I was aiming for.

Ladyfingers
Adapted from Delicious Days

Yields 25+ ladyfingers (these lovely approximations pop up when I start pinching cookies before the counting is done)

3  eggs, divided
90g  sugar*
1 tsp  vanilla
60g  flour
powdered sugar
  1.  Preheat the oven to 200C (390F) and line two trays with silpats or parchment paper.
  2. Combine the yolks and about half the sugar in a bowl and beat to around ribbon stage (pale yellow, thick, and leaves a trail when dribbled on the surface of the mixture).
  3. Stir in vanilla.
  4. In a separate bowl, combine the egg whites and the remaining sugar and beat until stiff peaks form.
  5. Sieve the flour into the yolk mixture and fold to clear (no flour remains visible).
  6. Add about one-third of the beaten whites and mix to lighten the batter; gently fold in the remaining whites.
  7. Fill a piping bag with the batter, snip the tip off (to about half or three-quarters of an inch in diameter), and pipe the batter in lines about 4" long, 1" apart.
  8. Dust the piped batter with powdered sugar (be liberal with it!) and bake about 13 minutes until light golden brown.
  9. Immediately remove the ladyfingers from the parchment or silpat and place them directly on the oven rack.
  10. Crack the oven door an inch or two and allow the ladyfingers to cool inside.
  11. Enjoy immediately or store in an airtight container.
Ladyfinger Reflections

 Unique ladyfingers (like snowflakes, no two are exactly alike, at least not piped at my hands) placed in the tray to test for fit, pre-espresso soaking.

When these first came out of the oven, they were pretty soft cookies; a far cry from the stiff, boiling hot coffee resistant store bought breed I'd dealt with before. I decided to treat them like baguettes or any bread that I want a crisper crust on, hence steps 9 and 10. When they came out of the oven, they were a sturdier version of themselves, but still not nearly as tolerant of physical abuse as the pre-packaged variety, which was just fine by me.

The cookies are plain and pleasant enough on their own, very light and mildly sweet, the vanilla peaking through. Okay, pleasant enough that the Resident Taste Tester and I gobbled down a good handful without blinking.

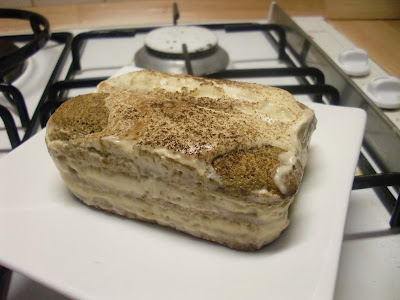
 Home made tiramisu.

They did a lovely job in the tiramisu. I gave them a double turn in cold espresso and didn't have any of the problems of packaged ladyfingers (namely burning my hands trying to get the espresso all the way through without complete mushification). The RTT and I ate the cake straight away, and were both daunted by the task of finishing one piece each (these packed a triple layer of soaked ladyfingers and mascarpone, mind you); so rich and there seemed to be slightly too much mascarpone. But! After one night in the fridge, the cake had settled and found its stride; the textures and flavors and pieces all came together to make us swoon before lunch time.

Ladyfingers are not created equal. Rather, some are squiggly, some shorter or longer than 4", and some look, um, suggestive. None of this matters (at least, not to me personally). What does is that you took the time to make something from scratch just because, and it tastes mighty fine.

*I use this website for converting baking masses to and from volumes