Ladyfingers piled into a tin shortly before being soaked in cold espresso.
I've done mis en place for tiramisu many, many times. I've even assembled these parts into a visually appealing (well, more or less given my fear of high speed plating) dessert on occasion. However, I've never made one of the very basic parts that arguably comprises a good two-thirds of the finished cake volume: Ladyfingers.
Egg whites and sugar beat to stiff peaks.
Why on earth would you make the ladyfingers when you can buy them at the store and save yourself some time? I understand that at home, making tiramisu might seem like a lengthy process and the prospect of making each and every one of those little cookies (some of which break or dissolve to mush during the espresso soaking) sounds daunting, but I just can't help myself.
Flour being folded into beaten egg yolks and sugar.
I need to know how things are made. I've come a long way from mixing flour, water, and food dye and "baking" it in the sun (I was a kid!), but the curiosity remains.
Vaguely neat rows of piped batter.
Like I said, I've made tiramisu before, so that's part of the reason I won't go over the recipe (the other being it's not mine to share - oooh secret recipes). This, my friends, is about the humble ladyfinger.
What I was aiming for.
Ladyfingers
Adapted from Delicious Days
Yields 25+ ladyfingers (these lovely approximations pop up when I start pinching cookies before the counting is done)
3 eggs, divided
90g sugar*
1 tsp vanilla
60g flour
powdered sugar
- Preheat the oven to 200C (390F) and line two trays with silpats or parchment paper.
- Combine the yolks and about half the sugar in a bowl and beat to around ribbon stage (pale yellow, thick, and leaves a trail when dribbled on the surface of the mixture).
- Stir in vanilla.
- In a separate bowl, combine the egg whites and the remaining sugar and beat until stiff peaks form.
- Sieve the flour into the yolk mixture and fold to clear (no flour remains visible).
- Add about one-third of the beaten whites and mix to lighten the batter; gently fold in the remaining whites.
- Fill a piping bag with the batter, snip the tip off (to about half or three-quarters of an inch in diameter), and pipe the batter in lines about 4" long, 1" apart.
- Dust the piped batter with powdered sugar (be liberal with it!) and bake about 13 minutes until light golden brown.
- Immediately remove the ladyfingers from the parchment or silpat and place them directly on the oven rack.
- Crack the oven door an inch or two and allow the ladyfingers to cool inside.
- Enjoy immediately or store in an airtight container.
Unique ladyfingers (like snowflakes, no two are exactly alike, at least not piped at my hands) placed in the tray to test for fit, pre-espresso soaking.
When these first came out of the oven, they were pretty soft cookies; a far cry from the stiff, boiling hot coffee resistant store bought breed I'd dealt with before. I decided to treat them like baguettes or any bread that I want a crisper crust on, hence steps 9 and 10. When they came out of the oven, they were a sturdier version of themselves, but still not nearly as tolerant of physical abuse as the pre-packaged variety, which was just fine by me.
The cookies are plain and pleasant enough on their own, very light and mildly sweet, the vanilla peaking through. Okay, pleasant enough that the Resident Taste Tester and I gobbled down a good handful without blinking.
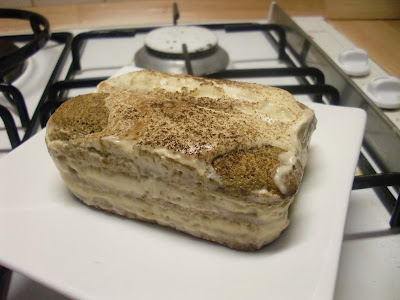
Home made tiramisu.
They did a lovely job in the tiramisu. I gave them a double turn in cold espresso and didn't have any of the problems of packaged ladyfingers (namely burning my hands trying to get the espresso all the way through without complete mushification). The RTT and I ate the cake straight away, and were both daunted by the task of finishing one piece each (these packed a triple layer of soaked ladyfingers and mascarpone, mind you); so rich and there seemed to be slightly too much mascarpone. But! After one night in the fridge, the cake had settled and found its stride; the textures and flavors and pieces all came together to make us swoon before lunch time.
Ladyfingers are not created equal. Rather, some are squiggly, some shorter or longer than 4", and some look, um, suggestive. None of this matters (at least, not to me personally). What does is that you took the time to make something from scratch just because, and it tastes mighty fine.
*I use this website for converting baking masses to and from volumes


Very fancy looking!
ReplyDeleteThanks, Cherish! I take pride in the fact that my ladyfingers are not like the uniform styrofoam bricks they try to pass off as such in the grocery store :) All that tiramisu was gone in two days; it would have disappeared sooner if we had the willpower to keep eating something so rich.
ReplyDeleteX M